


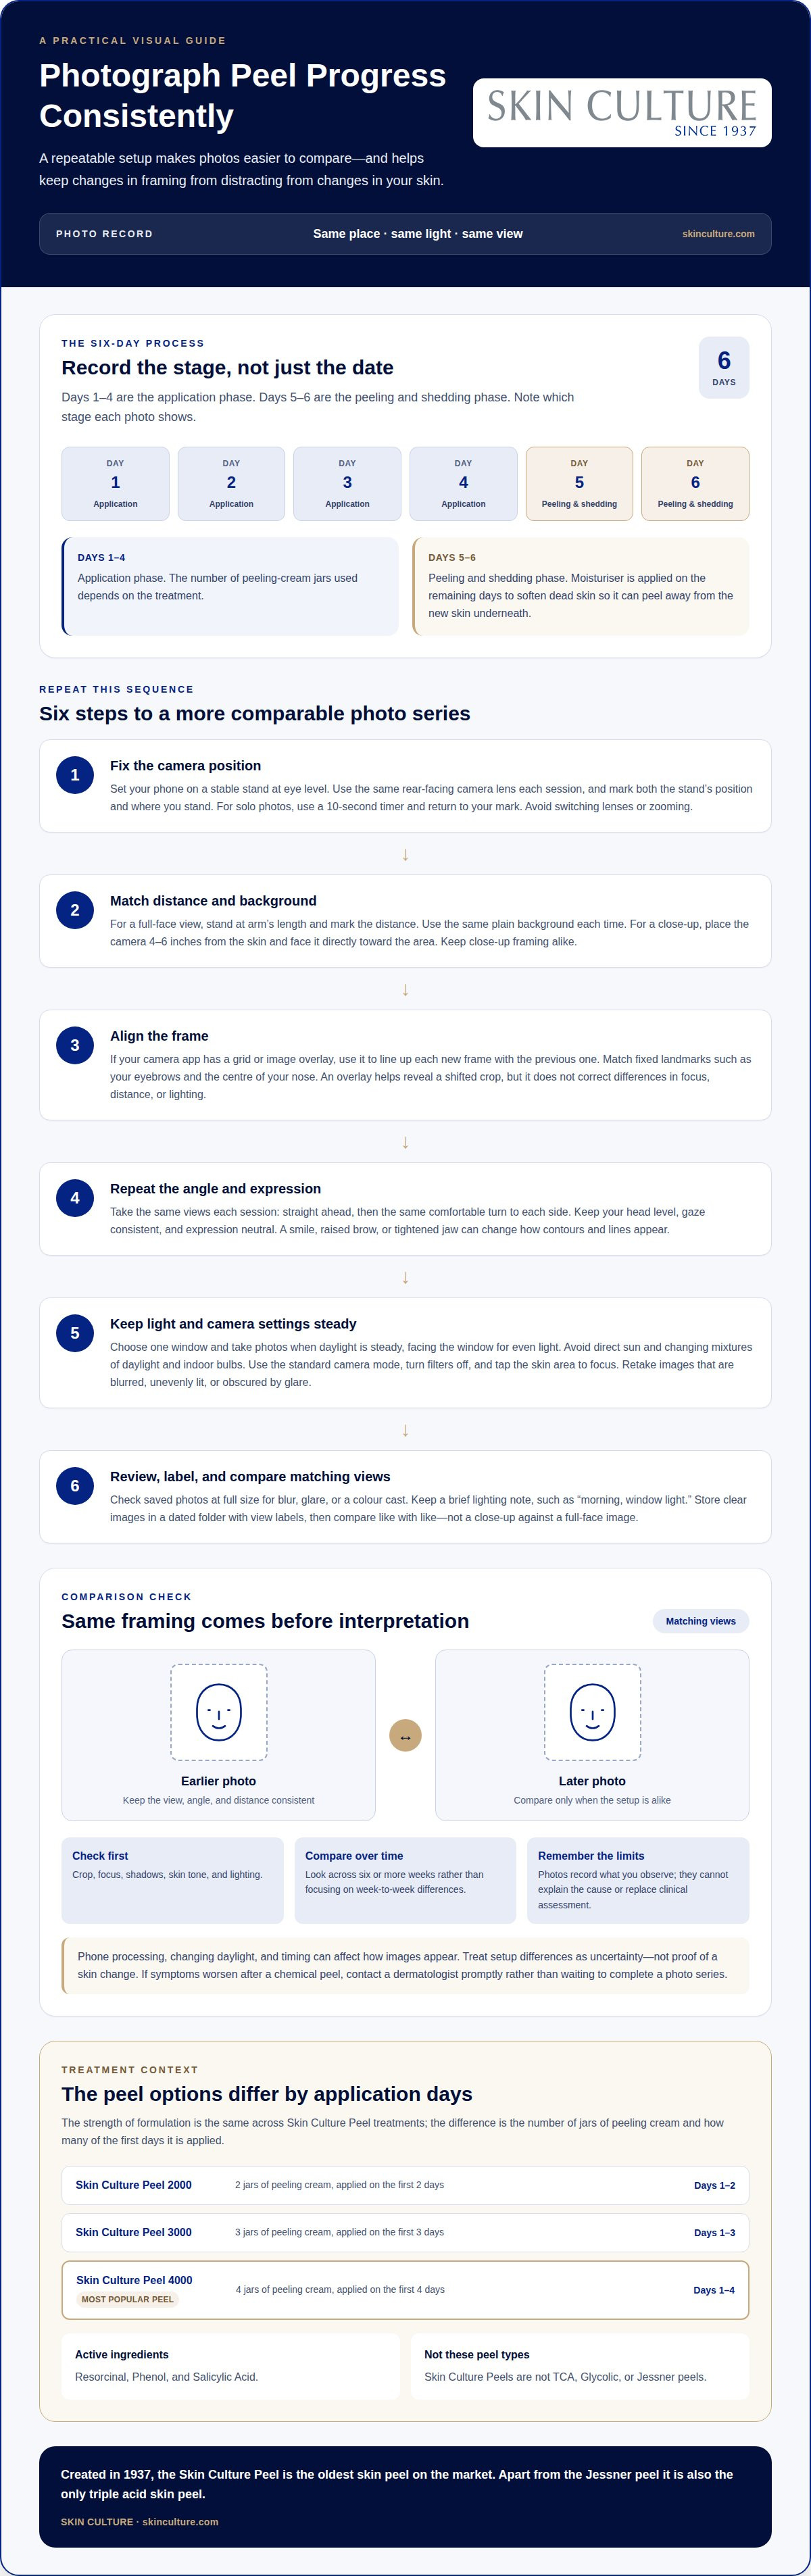
Knowing how to photograph peel progress accurately starts with repeating the same setup: use one location, consistent lighting, the same camera angle and distance, and clean, bare skin. Keep the camera steady and take each set at the same time of day. For a six-day Skin Culture Peel, note the stage you’re photographing: days 1–4 are the application phase, while days 5–6 are the peeling and shedding phase.
A dramatic before-and-after isn’t necessarily a useful comparison. Changes in lighting, angle, or peeling stage can make two photos look different even when your skin has not changed in the same way. Learn how to keep photos consistent, judge whether they’re genuinely comparable, and choose a tracking schedule that feels useful without becoming a daily obligation. Photos can show what you observe, but they can’t explain the cause, so use them to support a measured view of the process rather than expect instant results.
Key Takeaways
- Choose a repeatable camera position and set of views so changes in framing don’t distract from changes in your skin.
- Use a plain background and steady lighting to make colour and texture easier to compare.
- Look for focus, angle, and lighting differences before interpreting changes between photos.
- Choose a photo schedule that matches your purpose, and keep tracking manageable rather than taking pictures every day.
- Use photos as a visual record, not as proof that a treatment caused a change or as a substitute for clinical assessment.
How do you make progress photos consistent?
To photograph peel progress accurately, keep your camera, lens, distance, and facial expression consistent. If symptoms worsen after a chemical peel, contact a dermatologist promptly rather than waiting to complete a photo series.
-
Repeat Camera Position and Framing
Place your phone on a stable stand at eye level, then use the same rear-facing camera lens each session. Mark the stand’s position and your standing spot so height and framing remain repeatable. For solo photos, set a 10-second timer and return to your mark. Avoid switching lenses or zooming, since either change alters how large or detailed the skin appears.
-
Match Camera Distance and Background
Stand at arm’s length for full-face views, and mark that distance on the floor. Keep the same plain background, such as a blank wall, behind you in every frame. For a close-up, position the camera 4–6 inches from the skin and face it directly toward the area. Keep close-up distance and framing alike; don’t compare a tight crop with a wider view.
-
Align Photos With a Camera Overlay
If your phone’s camera app offers a grid or image overlay, use it to align each new frame with the previous one. Match fixed landmarks, such as your eyebrows and the centre of your nose, to the same grid lines. An overlay can reveal a shifted position or changed crop before you take the picture, but it won’t correct differences in focus, distance, or lighting.
-
Keep Angles and Expressions Consistent
Take each facial view from the same angle: straight ahead, then the same comfortable turn to each side. Keep your head level and your expression neutral. A smile, raised brow, or tightened jaw can alter how contours and lines appear. Check that your chin height and gaze match the earlier photo. When learning how to photograph peel progress accurately, retake a view if your pose differs noticeably.
Using consistent lighting and a plain background
Use soft, even natural light, a plain background, and the same camera settings for every session. The American Academy of Dermatology recommends clear, well-lit, sharply focused photos with filters disabled, so skin colour and texture appear closer to how they look in person.
-
Choose Consistent Natural Lighting
Choose one window and take photos while daylight is steady, facing the window so light falls evenly across your face. Avoid direct sun, which can create bright patches and deep shadows that make redness or flaking look more pronounced. Pick a repeatable time, such as morning, and keep to it for later sessions. If clouds or changing daylight make the room look noticeably different, wait for more comparable light.
-
Use a Plain Neutral Background
Stand in front of a blank, light-coloured wall that won’t distract from visible skin details. Use the same background for each session: a patterned curtain or colourful wall can affect how skin colour appears in a photo. Check the frame for nearby objects and coloured surfaces that might reflect light onto your face. A neutral setting also makes it easier to spot differences in the overall colour of photos.
-
Set Lighting and Camera Settings
Open your phone’s standard camera mode, turn off filters, and tap the skin area to focus before taking the photo. Use the same camera mode between sessions rather than switching to portrait effects or a beauty setting. Before saving, check that the image is sharp and evenly lit. The American Academy of Dermatology recommends photos that accurately show skin colour and texture, not an artificially brightened or softened version.
- Check the lighting before each session. Look at the wall and your face in the camera preview. If one side is much brighter or a strong shadow crosses your cheek, adjust your position relative to the window. Don’t add a lamp for one photo if earlier images used daylight alone. Mixing daylight and indoor bulbs can create different colour casts, making skin appear warmer or cooler.
- Review the saved image at full size before comparing it with earlier photos. Look for blur, glare, or a colour cast, and retake the picture if these issues obscure the skin. Keep a brief lighting note with each photo, such as “morning, window light” or “overcast daylight.” This can explain why otherwise similar images look different and make your visual record more useful.
Evaluating photo comparability and uncertainty
Before judging a change, decide whether the pictures are comparable. A consistent setup helps, but phone processing, daylight, and timing can still affect what the images appear to show.
-
Identify Factors That Distort Comparisons
Check for changes in crop, sharpness, shadows, and skin tone before interpreting the images. A bathroom selfie under bright ceiling lights may look different from a picture taken near a window, even if your skin looks much the same. Phone cameras also process images automatically, and changing daylight can shift colours. Treat differences in setup as a source of uncertainty, not evidence of a skin change.
-
Organize and Compare Progress Photos
Save each clear image in a dated digital folder, using labels such as “front view” or “left cheek.” Put matching views side by side rather than comparing a close-up with a full-face picture. Check for blur and framing differences first. If you change phones or camera setups, mark that as the start of a new series instead of assuming the images align seamlessly.
-
Compare Changes Over Longer Periods
Compare photographs across six or more weeks rather than focusing on week-to-week differences. Changes at weeks 2–4 can be subtle, and spot fading may be difficult to see in pictures then. If progress seems stalled, look back at images from 3, 6, or 12 months earlier when available. Longer comparisons can reveal gradual shifts that individual pairs of images may not make obvious.
- For a mole, frame the entire mark and include 1–2 cm of surrounding skin. That context helps you see the mole’s edge and nearby skin in each picture. Keep the same view and scale across the series, and avoid relying on a tightly cropped selfie that cuts off its borders. Photographs can help document visible differences, but they don’t establish a diagnosis.
- Separate what you observe from conclusions about the cause. A pair of pictures alone cannot establish that a treatment produced every visible difference, and a home photo diary isn’t a validated clinical outcome assessment. Automated skin-analysis scores also don’t prove biological change or treatment effectiveness on their own. Use images as a record of appearance, not as a measurement or verdict on treatment.
Supporting healthy, low-pressure photo tracking
Let your photo diary answer one clear question about your skin rather than prompting constant inspection. A short written record can add context that an image cannot show.
-
Use Photos to Track Skincare Progress
Choose one concern to follow, such as uneven-looking tone on a particular cheek, and keep your notes focused on that area. Decide in advance what you’ll record, such as visible texture or the outline of a mark. Review the photos at a planned time, then close the folder. This gives each photo a purpose and helps prevent repeated checking from turning skincare tracking into a source of pressure.
-
Include Scale References
Use a scale reference only when size matters to the question you’re tracking. For example, a ruler beside a small spot on the body can provide context that a close crop lacks. Keep the reference outside the area of interest, and remember that perspective can affect how large an object appears. A reference adds context to a photo; it doesn’t make a phone image a clinical measurement.
-
Decide Whether to Include Makeup or Products
Keep product information in your written log rather than arranging bottles beside your face. A product label can distract from the skin and change the frame, while a brief note can record what you used and when. If you’re assessing appearance, make the image itself an unembellished record. Keep product documentation separate so you can consider routine changes without treating them as visible proof of cause.
-
Document Skin Changes After a Peel
Describe what you observe in plain terms, then note sensations separately. For example, write “dry-looking area near the jaw,” followed by “feels tight.” Avoid labels that imply a diagnosis or explain why a change occurred. This distinction preserves useful information for later review and gives a healthcare professional clearer context if you choose to discuss the images.
Keep the image focused on the skin rather than coverage or styling. Photograph clean, bare skin without makeup; bare skin, rather than concealer or foundation, is recommended for progress photos. After cleansing, wait five minutes for facial redness to settle before taking pictures. This helps the image reflect your skin after that brief pause, rather than capturing redness immediately after washing. For a specific spot on the body, the guide recommends including a ruler or coin in body-skin photos as a size reference. Keep the reference relevant to the spot you’re following so you can compare its visible size over time.
A frequent photo can seem to show a meaningful shift when it captures only a temporary difference. A person's body does not visibly change in 24 hours, so daily progress photos mainly track short-term variables such as water retention, meal timing, and lighting. The page recommends taking skincare progress photos every two weeks. That interval can make each image part of a calmer comparison rather than an invitation to judge every small variation. If an image looks different, keep the observation modest and consider the short-term variables noted above before treating it as evidence of lasting progress or a setback.
How do you make progress photos consistent?
Use the same camera, lens, distance, and facial expression each session. These steps show how to photograph peel progress accurately at home. If symptoms worsen after a chemical peel, contact a dermatologist promptly rather than waiting to complete a photo series.
-
Repeat Camera Position and Framing
Place your phone on a stable stand at eye level, then use the same rear-facing camera lens each session. Mark the stand’s position and your standing spot so height and framing remain repeatable. For solo photos, set a 10-second timer and return to your mark. Avoid switching lenses or zooming, since either change alters how large or detailed the skin appears.
-
Match Camera Distance and Background
Stand at arm’s length for full-face views, and mark that distance on the floor. Keep the same plain background, such as a blank wall, behind you in every frame. To photograph peel progress accurately in a close-up, position the camera 4–6 inches from the skin and face it directly toward the area. Keep close-up distance and framing alike; don’t compare a tight crop with a wider view.
-
Align Photos With a Camera Overlay
If your phone’s camera app offers a grid or image overlay, use it to align each new frame with the previous one. Match fixed landmarks, such as your eyebrows and the centre of your nose, to the same grid lines. An overlay can reveal a shifted position or changed crop before you take the picture, but it won’t correct differences in focus, distance, or lighting.
-
Keep Angles and Expressions Consistent
Take each facial view from the same angle: straight ahead, then the same comfortable turn to each side. Keep your head level and your expression neutral. A smile, raised brow, or tightened jaw can alter how contours and lines appear. Check that your chin height and gaze match the earlier photo. Retake a view if your pose differs noticeably.
Skin Culture Home Skin Peel
Skin Culture Home Skin Peel offers the Skin Peel 4000, Skin Peel 3000, and Skin Peel 2000 for at-home use. A simple photo log can help you keep observations organized as you follow your chosen peel.
Record the date and your observations alongside each image. This creates a personal visual record without treating photos as a clinical measurement or proof that a peel caused a particular change.
If you’re considering a home peel and have questions about the available options, contact Skin Culture Home Skin Peel. We’re here to help you take an informed next step.
Make your photo diary support your next step
Let your photo diary serve a practical purpose, not become a test you feel you must pass. To photograph peel progress accurately, use images to record what you observe and leave clinical interpretation to an appropriate healthcare professional. If a concern changes or causes worry, prioritise getting advice over taking another comparison photo.
If you’re considering a home peel, choose an option with a process you can follow and document calmly. Skin Culture Home Skin Peel offers Skin Peel 4000, Skin Peel 3000, and Skin Peel 2000. Your photo routine can help you keep track of the experience, but it shouldn’t create pressure to judge every daily change or promise a particular result.
To explore the available peels and decide what feels like a suitable next step for your skincare routine, contact Skin Culture Home Skin Peel. Take your time, stay attentive to your skin, and let a thoughtful routine guide you forward.
Frequently Asked Questions
How to take amazing before-and-after photos?
Make the images informative rather than dramatic. Include an overall facial view to show general appearance, then a close-up of the specific area you’re monitoring. Keep the original files and avoid edits that change colour, texture, or shape. If you plan to share images with a medical practice, ask how to send them securely. A polished-looking photo matters less than a clear, honest record.
What else should you know?
A photo can help describe what you’ve noticed, but it cannot explain the cause. The British Association of Dermatologists notes that clinical photo review includes medical information and may still require an in-person assessment. If you’re documenting a concern for a clinician, include relevant context in your notes, such as when you first noticed it. Seek medical advice promptly for a new, worsening, or worrying skin concern.
How to take consistent before-and-after photos of skin peel progress
Decide which views answer your tracking question before taking the first picture. For example, a concern on one cheek may need a full-face view for context and a close-up to show detail. Keep both views in the series and label them clearly so you compare like with like. A set showing the same area from different distances can create a misleading impression of change.
How far apart should photos be taken during chemical peel recovery
Choose the interval according to the purpose of the record. For a prescribed procedure, follow the timing and views requested by the practitioner, who may need images at particular points. For personal tracking, avoid taking pictures whenever you feel uncertain; frequent checking can make small visual fluctuations seem more important. If symptoms worsen or concern you, seek medical advice rather than waiting for a scheduled photograph.
How to photograph peeling, redness, and irritation without misleading results
Include enough surrounding skin to show where the change occurs, and take a separate close-up if detail matters. Photograph flakes and redness in their natural state; don’t alter the area to make it more visible. Add a short written note about sensations, such as tenderness or tightness, because a photograph can’t record them. If symptoms are worsening or worrying, contact an appropriate healthcare professional instead of relying on images.
What are the risks of taking progress photos in direct sunlight or with filters
Direct sunlight can create strong highlights and shadows that make skin texture or redness look more pronounced. Filters and beauty effects can alter colour, soften detail, or conceal visible features, making comparisons less useful. Keep the unedited original as your record. If you accidentally take a filtered picture, don’t treat it as equivalent to an unfiltered image; label it clearly or leave it out of the comparison.
How to track peel progress with a photo log and date labels
Use a simple file name that records the date, view, and any change in camera setup. For example, label a new phone series so you don’t mistake differences in camera processing for skin changes. Keep original images separate from crops or edits, and add brief notes about anything the photo cannot show. If you share the record with a medical practice, ask about its secure method for receiving images.
Disclaimer
Testimonials are the individual experiences of those who have used our skin peels. Individual results may vary.